The Surrender on the Lüneburger Heide
Montgomery’s 21st Army Group (comprising the British Second Army and First Canadian Army) crossed the Rhine on the 23rd March 1945 (Operation Plunder) and made swift progress eastwards as German resistance crumbled.
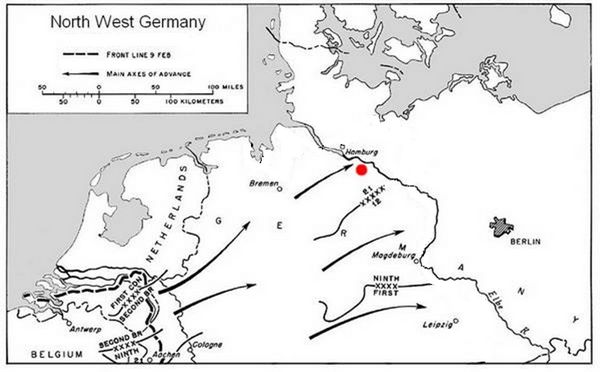
The Rhine crossings and the location of Lüneburg (captured 18th April 1945) are marked on this map.
It can be seen that the Netherlands and a very large area of NW Germany were quickly overrun.
The Head of State, after the death of Adolf Hitler, was Groß Admiral Karl Dönitz. He knew (from captured documents) the plans for the Allied Zones of Occupation and felt he should instigate a series of local surrenders which would 'buy time' to allow as many troops as possible to be captured by the western allies before the complete cessation of hostilities.
At 08:00hrs on the morning of the 3rd May 1945 a German delegation led by General Admiral von Friedeburg crossed the British lines north of Hamburg and were escorted to the Villa Möllering in Häcklingen, the Headquarters of General Miles Dempsey (Commander, British Second Army).
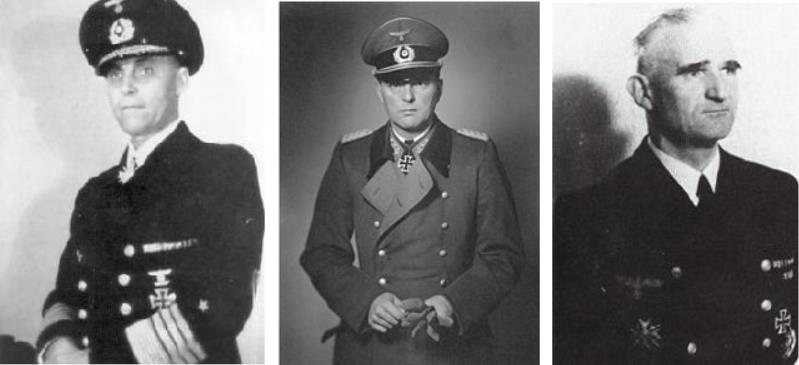
The senior members of the German delegation:
Admiral Hans-Georg von Friedeburg, General Eberhard Kinzel and Rear Admiral Gerhard Wagner
After questioning, it appeared that Friedeburg was a representative of General Keitel (head of the Army) and Admiral Dönitz (Head of State) who wished to surrender. General Kinzel was acting on behalf of Field Marshal Busch (head of Army Group Northwest) and Rear Admiral Wager was a senior member of von Friedeburg's staff.
Quite by chance, arriving at the same time was a second delegation who wished to negotiate the surrender of Hamburg. This was led by a Luftwaffe General Alwin Wolz, the commander of the German forces in Hamburg. The surrender was offered to General Spurling in the Hamburg townhall on the same day.
Four of the main German delegation were taken to report to Field Marshal Montgomery at his TacHQ situated approximately 8km east on the Timeloberg (an area of higher ground on the Lüneburger Heide). The others stayed in the Villa.
Note: The Timeloberg was the 27th TacHQ location since leaving the UK eleven months earlier.

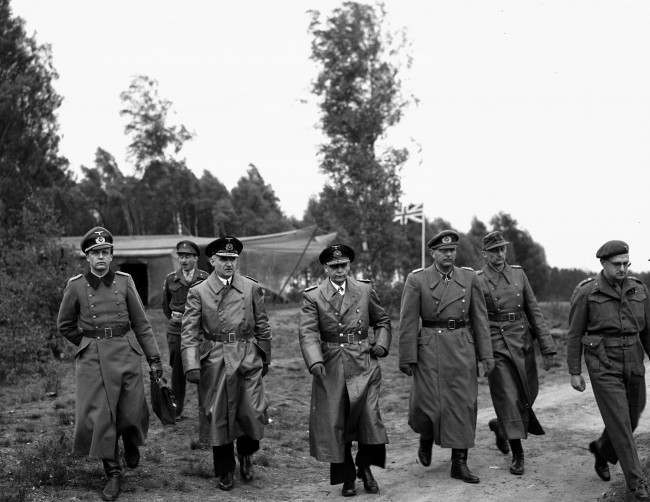
The German delegations seen arriving at the Villa Möllering.
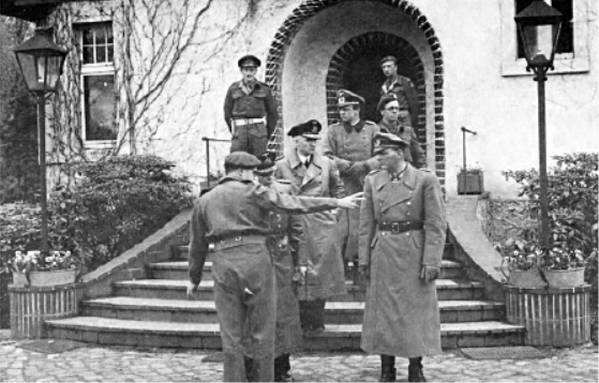
A smaller group of four leaving the Villa Möllering to be taken to Montgomery's TacHQ on the Timeloberg.
Instructions are being given to them by Col Ewart while Captain Knee stands behind the German delegation.
A British car was used to transport them, their own car followed behind with only a driver.
Montgomery was advised by radio of their departure for his HQ and, on their arrival, they were made to wait in the open under a Union Jack that had been set up on a pole. When Montgomery appeared from his famous caravan he asked, through an interpreter: "Who are these men?" and, on receiving their answer, he barked, "I've never heard of them" and then asked, "What do they want?"
Field Marshal Montgomery (centre of the British uniforms) meets Admiral von Friedeburg (who holds a letter from Field Marshal Keitel), General Kinzel and Rear Admiral Wagner. Major Friedel is just off picture on the RHS.
In an interview, many years later, Captain Derek Knee (at attention) recounts how he was 'encouraged' forwards by Col Joe Ewart (LHS) to be the interpreter.
Col Ewart was very confident with written/spoken German and frequently acted as Monty's interpreter. However, on this occasion, he welcomed some assistance as he was in overall charge of the proceedings.
The letter from Field Marshal Keitel offered to surrender Army Group Vistula. Initially, von Friedeburg tried to read the letter in English but it was quickly passed to Captain Knee to translate.
Army Group Vistula comprised arround 500,000 troops but were badly equipped and "shattered skeletons of their former selves".
Army Group Vistula was deployed north of Berlin in an area that would become part of the Russian Zone of Occupation.
Montgomery would have nothing to do with German forces on his eastern flank as this was "Russian business".

Marked in red are the locations of Lüneburg and the area occupied by Army Group Vistula.
The British Army had made a huge effort to move the front line up to the north coast between Lübeck and Wismar.
The aim was to prevent advancing Soviet forces from passing by into the Danish peninsula.
Montgomery said that only unconditional surrender of all German forces to his northern and western flanks would be acceptable........this meant the Netherlands, all of northwest Germany (including the Frisian Islands and Heligoland) together with Schleswig-Holstein and Denmark.
At this point the German delegation were offered lunch (which included wine and brandy) and given the opportunity to consider what had been said.
It is reported that an excellent meal was created from British 'compo' rations and that the Germans were impressed. A German speaking officer, who had been smuggled into the dining room disguised as the Mess Sergeant, apologised for the quality of the food adding that "our boys wouldn't touch this muck".
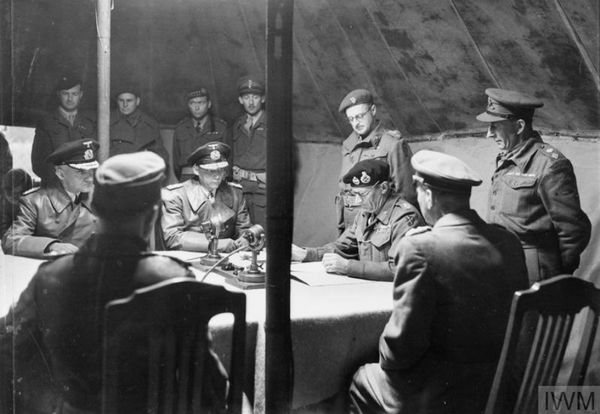
After lunch the German delegation were shown into Montgomery's tent and given a detailed briefing on the current military situation during which Admiral Friedeburg became somewhat tearful.
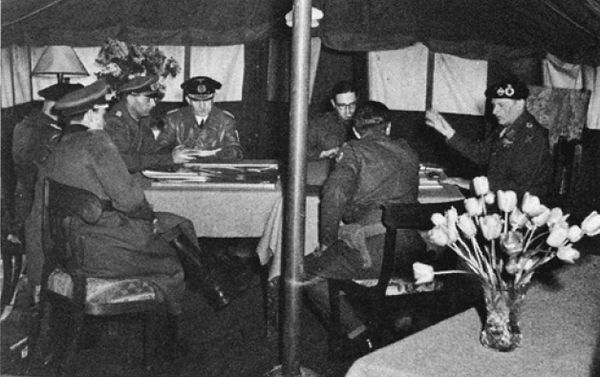
The four man German delegation are given the briefing in a comfortable and well decorated tent complete with flowers and a standard lamp
The LHS is the delegation, Monty is at the head of the table and Col Ewart is facing Captain Knee
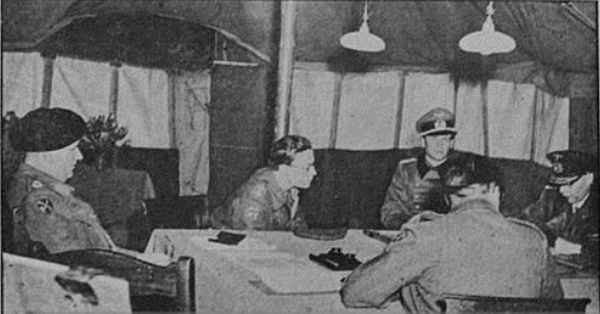
The same scene from the opposite direction - Monty and the German delegation with Captain Knee and Col Ewart on opposites sides of the table
The German delegation felt they did not have the authority to make the necessary decisions. It was agreed that Admiral von Friedeburg and Major Friedel would return to Dönitz's headquarters which was located in the Naval Academy in Mürwik, a suburb of Flensburg to seek his approval. Allied air operations over the area were suspended in order to ensure safe passage. Lt. Col. Warren (Montgomery's PA) together with Captain Knee guided the two German officers back through the British lines. Sgt Kirby (responsibly for security and intelligence), Major Richard O’Brien and an escort accompanied the Germans back to Flensburg.
The remaining two German officers stayed at Montgomery's TacHQ.
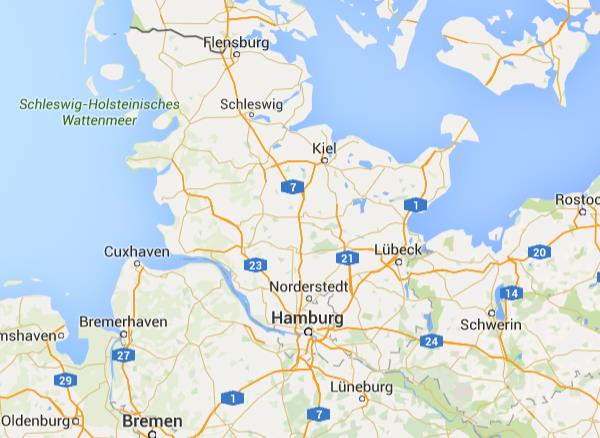
Flensburg and Lüneburg are shown at the top and bottom of this map..... the distance between them is over 200km.
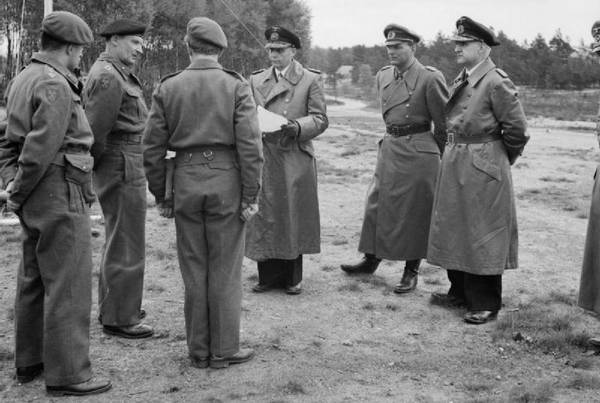
The 11th Hussars, stationed at Quickborn were told to expect the return of the German delegation. In the afternoon of the following day (Friday 4th May 1945) the Germans recrossed the British front line and they were escorted back to Montgomery's HQ.
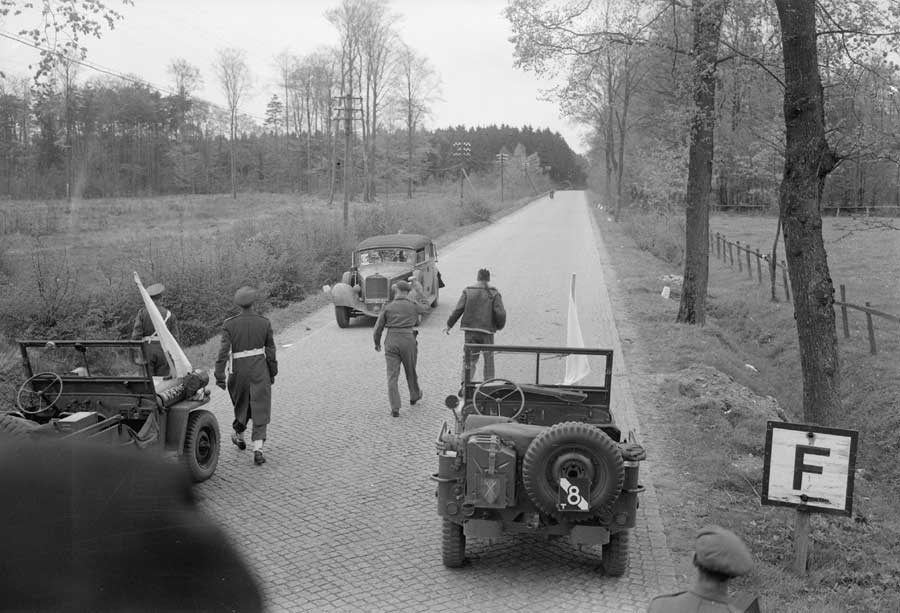
Captain Horsford of the 11th Hussars meets the German delegation near Quickborn, north of Hamburg.
A press conference was called for 17:00hrs and Montgomery outlined what had taken place and what was about to happen.
The German delegation with the addition of Col Fritz Poleck arrived whilst the press conference was still in progress.
When Montgomery finished the press conference, the German delegation were once more paraded under the Union Jack for the photographers. Montgomery took von Friedeburg to his caravan and asked if would sign the surrender document. To assist the Admiral's decision, a number of Allied fighter-bombers flew low and fast over the hilltop.
From LHS: Maj Friedel, Rear Admiral Wagner, Admiral von Friedeburg, General Kinzel and Colonel Poleck.
The LHS British officer is Col C P 'Kit' Dawnay and Col Joe Ewart is on the extreme RHS.
The German delegation were then shown into a carpeted tent and the terms of the surrender were read out by Montgomery.
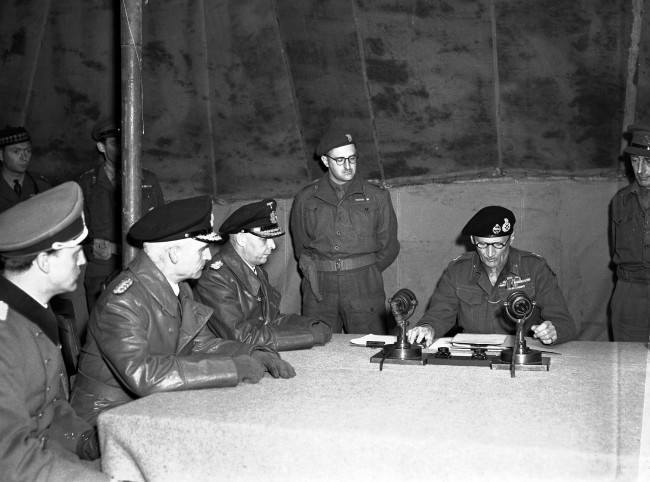
At 18:30 the German delegates signed the Instrument of Surrender which would come into force at 0800hrs British Double Summer Time on Saturday 5th May 1945.
Montgomery's PA, Lt Col Trumbull Warren, later described the events in "Monty, Biography of Montgomery" by Nigel Hamilton.
The senior German officer was General Admiral von Friedeburg, commander-in-chief of the German fleet. General Kinsel, chief of staff of the German army was “a magnificent looking officer about 6' 5" ... complete with monocle -- a real professional Prussian.” Next was Rear Admiral Wagner, flag officer to the admiral of the fleet. And Major Friedel, who had “the cruellest face of any man I have ever seen.” A fifth officer -- a Colonel Poleck -- joined the group for the signing.
The five German signatories plus Field Marshall Montgomery sit at the table, covered by an army blanket, to sign the surrender document.
The German officers facing the camera are Rear Admiral Gehard Wagner & Admiral Hans-Georg von Friedeburg.
The two officers with their backs to the camera are (L to R) Colonel Fritz Poleck and General Eberhard Kinzel (Major Hans Jochen Friedel is off the LHS, see below).
Standing behind Montgomery.....L to R.....Unknown, Chester Wilmot, Lt Col Trumbull Warren, Col C P Dawnay, Col Joe Ewart and Lt Col Franz Weidman, the senior British PoW interrogator for 21 Army Group.
A second view of the ceremony........L to R.........Major Hans Jochen Friedel, Rear Admiral Gerhard Wagner and Admiral Hans-Georg von Friedeburg.
The rear row.......L to R.....Lt Col Trumbull Warren (wearing a Glengarry), Col C P 'Kit' Dawnay, Col Joe Ewart amd Lt Col Franz Weidman.
(Note: Colonel Ewart's full name was James Oliver Ewart and was always known as Joe Ewart)
All B&W images are © Imperial War Museum.
Although covering a large geographical area and involving a significant number of German units, the surrender on the Lüneburger Heide is viewed strictly as a local capitulation.